Getting started
You start with Decisimo from the policy you already use to make a decision. Describe it in your own words, upload the document, or provide both. The assistant designs a decision flow from that information, then builds the test data, endpoint and release around it. The first result is a decision your systems can call. If your policy describes work that people do over days, the assistant designs a case instead.
- What happens when you sign up
- Prepare your policy
- What the assistant builds
- Build by hand instead
- After your first decision flow
What happens when you sign up
A new account opens on the AI Decision Assistant. It is a short wizard with three steps, and Continue moves you from one to the next.
- About You asks for your Company Size and your Expected Monthly Decision Volume. Both are required.
- Your Business asks for your Industry Vertical: Credit & Lending, Insurance, Fraud Detection or Other. Business Model is optional. You could enter a description such as "Online lending platform for small businesses".
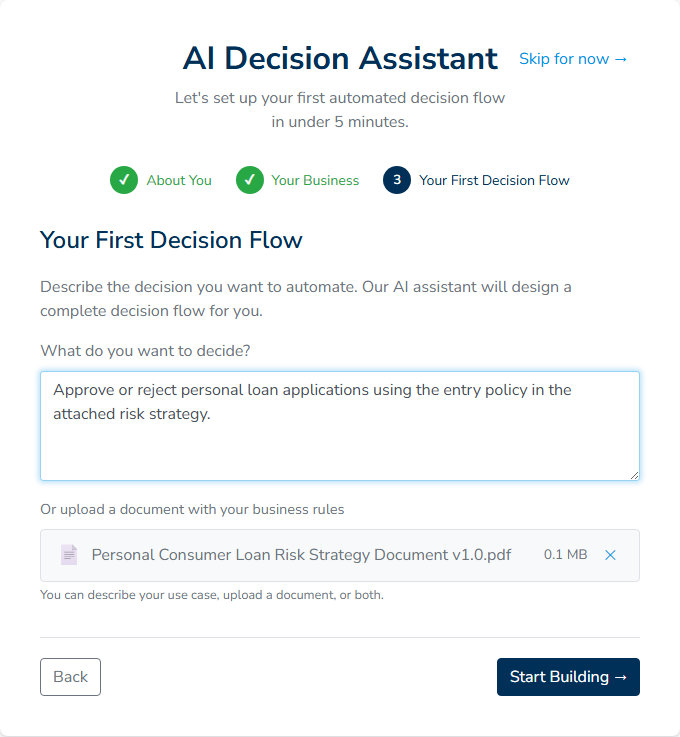
- Your First Decision Flow asks What do you want to decide? and offers a place to upload a document below it. This is where your policy goes.
Press Start Building → on the last step and the assistant takes over in a chat. It may ask questions before it builds anything, and you approve the proposed design before the build begins. If you would rather look around first, Skip for now → takes you to the dashboard. The dashboard's Build a decision flow with AI button brings you back to the wizard later.
Prepare your policy
The last wizard step accepts a description, a document, or both. The hint under the upload zone says so: You can describe your use case, upload a document, or both. One of the two is required.
A description is a few sentences about the decision in your own words: what comes in, which rules apply and what the answer can be. The placeholder changes with the industry you picked. For credit, it reads "Evaluate loan applications based on credit score, income, employment, and debt-to-income ratio". Under it, there is a second example for work that people do, such as an underwriter reviewing the applications covered by the rules.
A document is the policy itself. Drop it on Drag & drop a PDF or Excel file here, or click to browse. The files accepted are:
- Excel and spreadsheet files: .xlsx, .xls, .csv and .ods
A file can be up to 50 MB. Word documents are not read directly, so save a Word policy as PDF before you upload it.
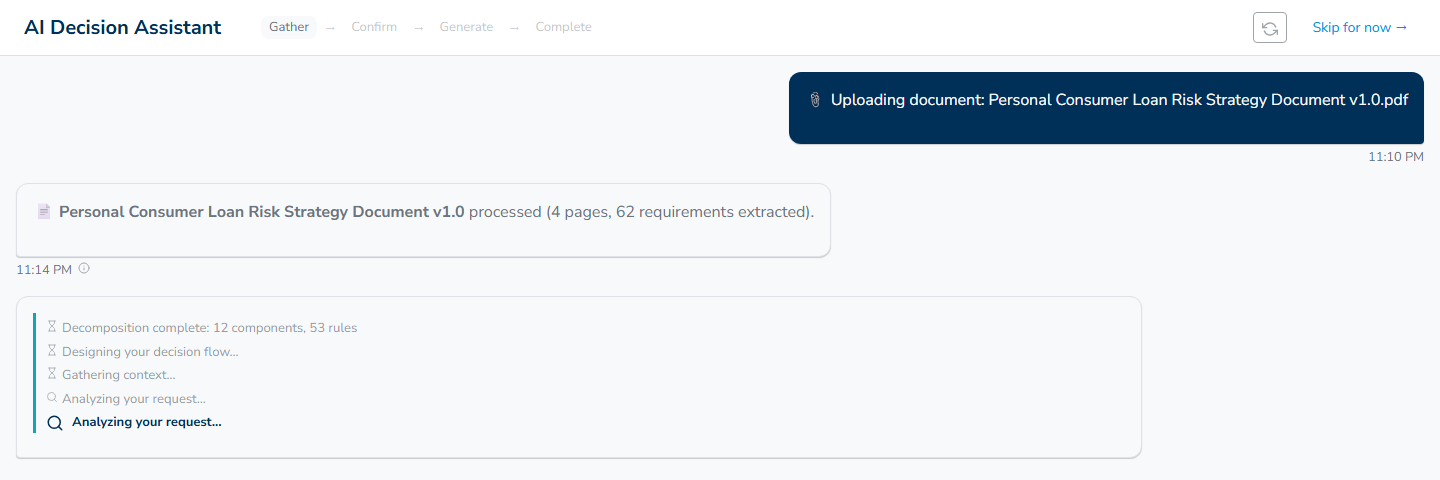
The assistant reads the document page by page and extracts the requirements it states. The chat reports how many pages were processed and how many requirements were extracted, and the design starts from those requirements. The document that works best is the one your team already applies: the thresholds, exclusions and outcomes written down as rules. Pages of background explain the policy to a person, but the assistant builds from the requirements. Use a description next to the document to say which part you want to automate first.
What the assistant builds
From your description and document, the assistant decides whether the policy describes an instant decision or work that people do, then builds one of two things. You review and approve the proposed design before it is created.
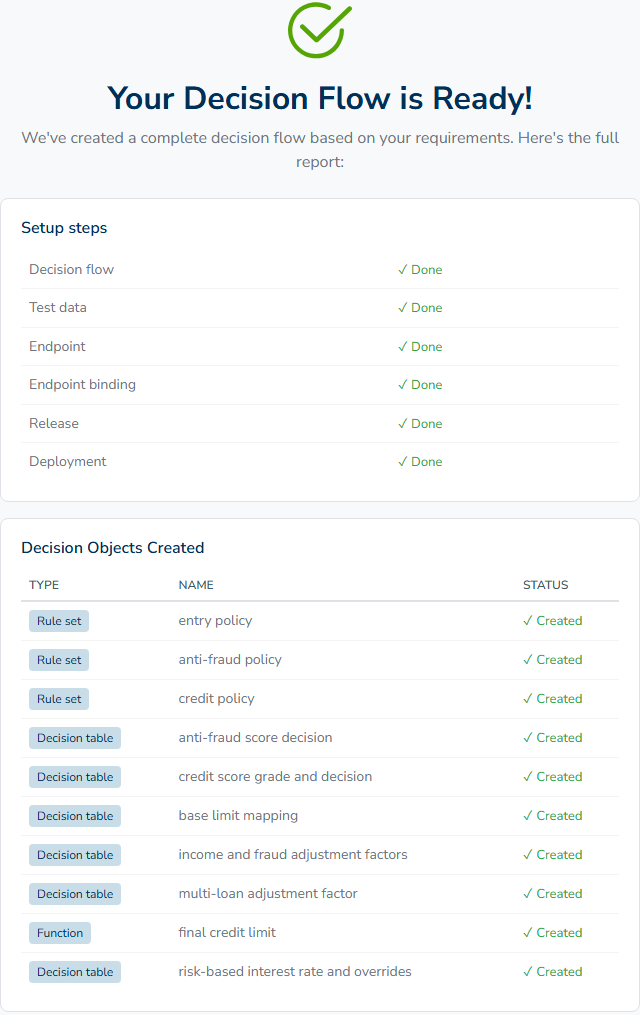
An instant decision. This is a decision your system sends data to and gets an answer back from, such as approve, decline or refer. The build report lists its Setup steps:
- Decision flow: the flow and the decision logic inside it.
- Test data: a sample input you can run the flow against.
- Endpoint: the address your system calls.
- Endpoint binding: the decision flow attached to that endpoint.
- Release: a released version of the flow.
- Deployment: the release deployed to the endpoint.
When all six are Done, the page says Your Decision Flow is Ready! and lists the decision objects it created. View decision flow → opens the flow in the editor.
Work that people do. When the policy describes review, waiting for documents or sign-off over several days, the assistant builds a case design. It sets up Case design, Case board and Execution node for cases, then creates Release and Deployment. The case board is a PostgreSQL database that you own, where the cases live and run.
If your account has no case board yet, the assistant tells you before it builds and gives you a choice. You can connect a database for your cases, or build an instant decision in which cases that need a person’s attention come out as an outcome such as "refer". The Connect your case board card takes a PostgreSQL connection string. On Supabase, use the session pooler string from Project Settings > Database. Later leaves the connection for another time, and an administrator can also connect the case board on the Destinations page.
A setup item can stop, for example, when your account has no execution node assigned yet. The report then marks it Stopped and marks the items that depend on it Waiting. Finish setting up runs the remaining items and keeps everything already done.
Build by hand instead
The assistant is one way to start. The dashboard also has Prefer to build by hand? with two links:
- Create a decision flow opens the decision flow list, where you create an empty flow and add its steps yourself.
- Start with a rule set opens the rule sets, for when you want to write the rules first and put them into a flow later.
A flow you build by hand goes through the same release and deployment process as one the assistant built. You run that process yourself instead of having the onboarding build run it for you. See Releasing a decision flow.
After your first decision flow
Once the first decision flow runs, these are the pages to read next:
- AI Decision Assistant for decision flows: change the flow by describing what you need. You approve each step of the plan, and nothing is saved until you save.
- Policy Documents: keep your policies in one library and check a release against their requirements.
- Data source: call an external REST or SOAP service from the flow. The assistant can configure it, and credentials go to the vault.
- Data Destinations: connect your own PostgreSQL or Supabase database to keep a record of every decision and its outcome.
- Analysis: backtest a release on your recorded decisions and mine new rules from their outcomes.
- Releasing a decision flow: release a new revision and deploy it to your endpoint.