A human task gives a person one piece of case work. Once its conditions are met (see When a task runs), the case opens a task for someone to handle. It includes instructions to read, an optional relationship chart, and fields to fill in. Everything the person submits is written to the case file, where other tasks can use it.
To create one, pick Human task as the Task type on a task card. The card itself, including its tabs, title, identifier, and saving, is described in Tasks. This page covers the settings unique to a human task, all on its Setup tab.
Assignee role
Assignee role decides who can pick up the task. It is a multi-select containing role titles from your user roles (see User role); you cannot enter a free-text role. Select one or more titles, and the task is offered to anyone who holds at least one of them. The hint next to the label shows the default: blank = anyone.
If a role is later renamed or deleted, a design that referenced the old title continues to show it as a selected chip. The setting is not silently emptied. Replace the stale chip with the current title.
Due in hours
Due in hours sets the task's deadline. When the task opens, its due date is that many hours ahead. Fractions work, so 0.5 means thirty minutes. Leave the field empty or set it to 0, and the task has no due date.
Review info
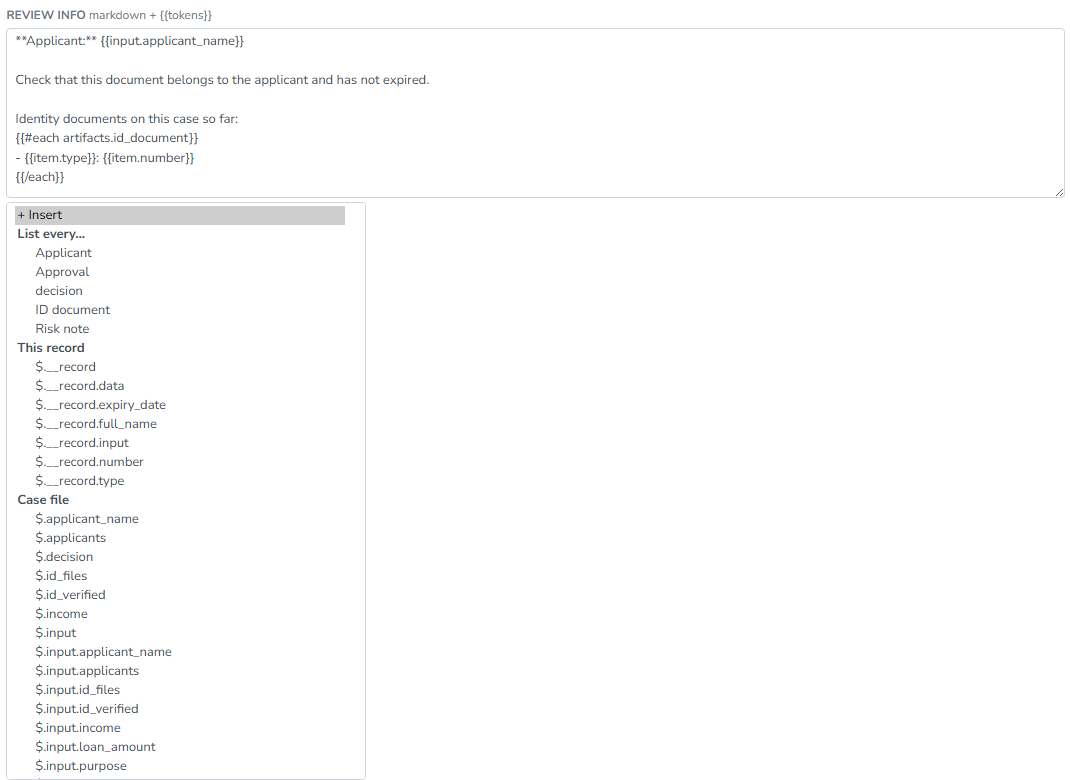
Review info is the text the person reads before answering. It uses markdown with {{tokens}}, exactly as the hint next to the label explains. When the task opens, each token is replaced with the current value from the case file. The instructions can therefore show live case data instead of asking the reviewer to look it up. The placeholder shows the pattern:
**Applicant:** {{applicant_name}}
A token names a location in the case file. Both spellings resolve to the same place: {{applicant_name}} and {{$.applicant_name}}. The task's Title field uses the same token replacement, so a title such as Review {{applicant_name}} names the applicant in the task list.
You do not have to enter tokens by hand. Below the text area, an Insert dropdown provides up to three groups:
-
List every… lists the record types in this design. Pick one to insert a ready-made block that loops over every record of that type, with one bullet per record:
{{#each artifacts.document}}
- {{item.name}}: {{item.status}}
{{/each}}
Inside the block,
{{item.<attribute>}}reads that attribute from each record. The generated line starts with the type's first attributes. If the type declares none, it falls back to{{item.__id}}. -
This record appears only when the task's When setting is For each record. It offers the bound record's attributes as
$.__record.<attribute>paths. A per-record task can then show the exact record it concerns. -
Case file lists the case file paths produced by the design's tasks. Pick one to insert it as a
{{...}}token at the cursor.
The next screenshot shows the Review info editor with the Insert menu open and an each-block already inserted.
Fields to collect
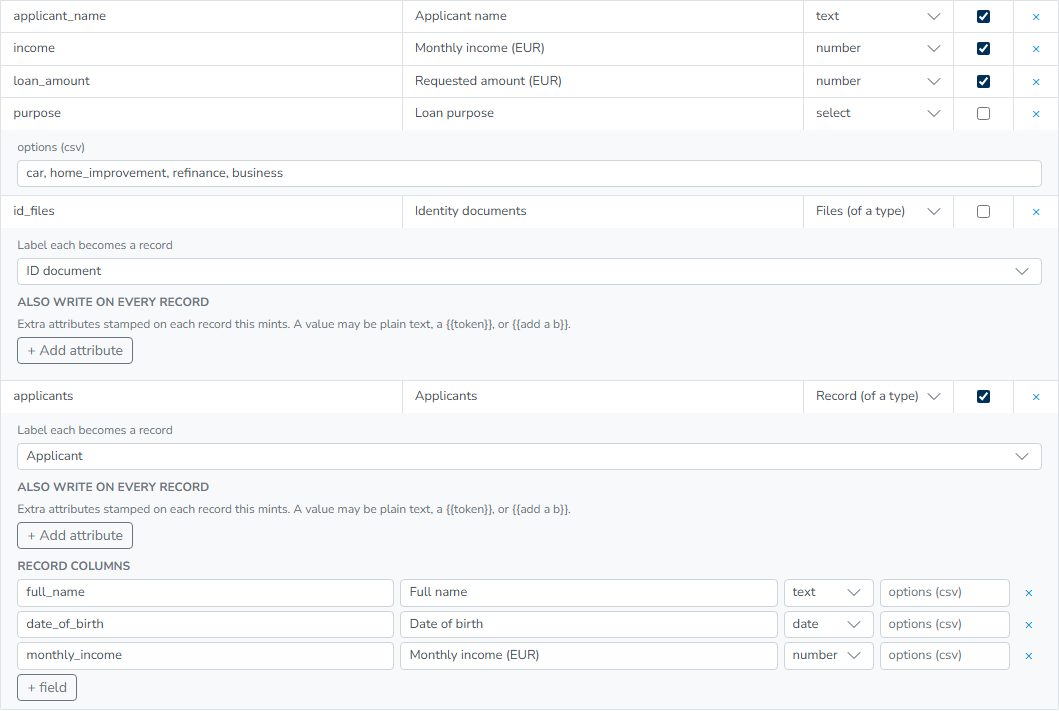
Fields to collect defines the form the person fills in. Each row represents one field and has four columns: key, the identifier under which the answer is stored, such as loan_amount; label, the question the person sees, such as "Loan Amount (€)"; type; and req, which you tick to make the field mandatory. Add rows with + field, or remove one with the × at its right.
Field types
The plain types render as their matching input: text, number, date, boolean, textarea, and file for a single file upload. Four types need extra configuration and open a panel below the row when selected:
selectandmultiselectask for options (csv): enter the choices separated by commas, for examplelow, medium, high. A select stores one choice; a multiselect stores several.- Files (of a type) collects any number of file uploads. Pick a record type, or create one on the spot with New record type. The note next to the picker explains what happens: each upload becomes a record. Every uploaded file lands in the case file as a record of that type, which lets a later Document OCR task find it.
- Record (of a type) puts a small table in the form. The person adds rows, and each row becomes a record of the chosen type. Record columns defines the table's columns. Each column has a name, a label, a type (
text,number,select,date,boolean), and, forselect, its own options (csv). Add columns with + field.
After Files (of a type) or Record (of a type) has a record type, an Also write on every record editor appears. Its rows are extra attributes stamped on each record this field creates. A value may be plain text, a {{token}}, or {{add a b}} for a derived number. The same stamp is available on output rows that create records, as described in Writing to the case file.
Record types themselves, including attributes, identity, and matching, are covered in Record types.
Chart
Chart adds an optional relationship chart to the task. It draws the chart from records already on the case file, so the reviewer can see how the parties connect instead of reconstructing those relationships from a table. Click + chart to add one, give it a Chart title, and remove it again with the × (Remove chart). The chart is built from two rule lists.
Node rules
Each row under Node rules turns every record of one type into nodes. Pick the record type, then provide two attribute paths on the record. The key, such as data.ico, identifies a node; the label, such as data.name, is the text shown on it. If two records produce the same key, they merge into one node. Tick subject to mark the nodes from that rule as the subject of the chart. Add rows with + node rule.
Edge rules
Each row under Edge rules turns every record of one type into connections. Pick the record type, then provide the attribute paths whose values name the two endpoints, shown as data.from and data.to in the placeholders. The chart draws an edge from the node keyed by the first value to the node keyed by the second. The predicate is the edge's label, for example owns.
The second line of each edge rule contains three optional paths: from_type_path, to_type_path, and predicate_path. Each can take the endpoint's type or the edge's label from a record attribute instead of a literal. If the path produces no value for a record, the literal is used. Add rows with + edge rule.
Where answers land
Every collected answer is written to the case file, and two settings determine where it goes.
Output key prefix sets where answers are written. The default is the root of the case file, $: the field loan_amount is written at $.loan_amount, and a field named applicant.income is written at $.applicant.income. Name a field after the path your decision logic reads and the logic finds it without a mapping.
A human task with the root prefix and no conditions is the intake form. A case opened through the API with a payload writes every payload key at its own path, so that task is answered by the payload when all its required fields are already there, and otherwise opens with those values filled in and asks only for the rest. A verdict a person must give belongs under its own prefix, such as $.review, where no payload can answer it.
Further down, Writes these attributes gives every form field its own row reading "Put <field key> (the answer) …". You cannot edit its source or delete it. Hovering over the row explains why: "Every answer has to go somewhere". You choose where the answer lands, not whether it lands. Change the destination key if the field's own name is not where you want the value.
Renaming or deleting a form field keeps the writes accurate. A row you have not changed follows its field and disappears with it. A row you retargeted remains even after its field is gone, so your destination choice is not silently discarded. It stays visible as a row referring to a field that no longer exists, ready for you to remove or reuse. The rest of the writes editor, including rows that create records, is described in Writing to the case file.
To see the finished form as the reviewer will, run the design in the test studio. An eligible human task there renders the review info, chart, and form from exactly these settings.